
August 05, 2016
I got a Spark Photon for Christmas. I had thought IoT sounded pretty cool ever since I saw a presentation at work about it, so I was pretty happy with this gift. Photon promises an Arduino-like experience, and I guess it is pretty good at this. Spark Photon was an option at a Hackathon I later on went to, which I’ll talk some more about in this post.
It doesn’t seem you can easily port over just any Arduino library to Spark Photon - at least, this was the case the last time I checked, which was about half a year ago I’ll admit. A lot may have changed since then, but I remember looking into how to import Arduino libraries into the Spark environment and not finding a lot of support for it. Even though it is dubbed “Arduino compatible”, I find that the term “Arduino compatible” is thrown around really vaguely and loosely. Make sure to do your research on anything advertised as such.
Anyhow I think my experience with the Photon was pretty good. It’s $20 online, which is less than an Arduino Uno. I’ll talk about the hackathon project I did with my partner and the Spark Photon in this post. We made an IoT pill dispenser which didn’t work so reliably, but using IoT was new to me and exciting back then, so I’m going to blog about it anyway for the sake of keeping memoirs.
We made an automated pill dispenser and counter, and basically just shoved in some IoT into it since we had a Spark Photon around. We made a front end client to go with it too, to input the number of pills to dispense, patient and medication information. We didn’t get around to making a back end with a database or anything, but oh well. We 3D printed the body of the dispenser.
If it seems like sort of a random idea, I had thought of an automated pill dispenser a long time ago, after talkign to some school friends. lot of my university friends are in pharmacy or were aiming for pharmacy school, and have volunteered at smaller neighbourhood pharmacies at some point. I asked them what they did at the pharmacies, and found out that they literally counted pills for patient orders by hand. Sometimes I hear people call pharmacists “pill counters” (I know pharmacists actually do a lot more than that - I don’t mean to trigger the pharmacist students), but it seemed kind of odd that they still do this in the 21st century. I hear in hospitals they have automated pill counters, but those are probably really expensive. Anyhow I had been wondering for a while how hard it would be to make a simple, low cost automatic pill counter.
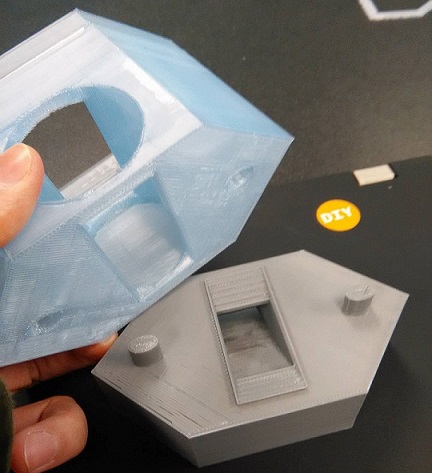
Anyhow, here’s a picture of the dispenser body:

Was based off of this design we found on Thingiverse.
We printed some of the parts from the public library’s 3D printer, which unfortunately has a strict two-hour per day 3D printing limit. The library had a Makerbot Replicator 2, and the preview of a standard quality tank for the dispenser on Makerbot’s desktop predicted over seven hours… so we simply scaled the prints along the y-axis by about 60% if I remember correctly. We also had to reduce print quality significantly to speed up the print time. I remember setting the infill to around 3%, haha. This wasn’t a precision device so I wasn’t too concerned. I also skimped out on the rafts. One of the library employees insisted on me using a raft for the tank as she was worried the print wouldn’t adhere, so I flipped the tank upside down and printed it with a significantly smaller raft. Should it have printed a raft for the full bottom it would have taken ages. I set the printing quality to “Low” on the Makerbot desktop client. That’s all I can remember off of the top of my head. I hope those tips help you if you, too, are subjected to this oppressive two hour time limit at your local public 3D printer.
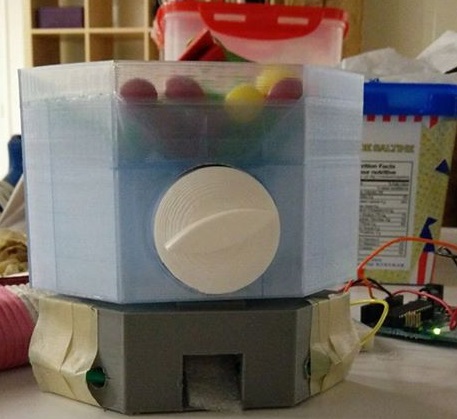
We used an IR break beam mechanism to tell when each pill was dispensed. Well, each Skittle. We used Skittles. But I’m just going to call them “pills” for the rest of this post. We made holes into each side of the dispenser base where the pills would have to pass. You can see where the IR emitter and receiver have been fed into the sides of the pathway here:

Yes, that is masking tape. Sorry, we didn’t have anything better around.
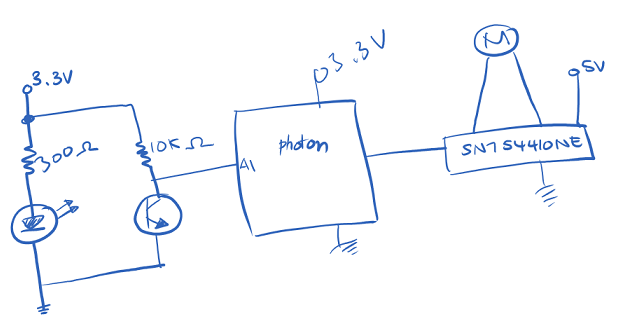
Here’s a schematic of the hardware we used:

What we messed up on is we didn’t have a good mechanism for the motor to smoothly turn the crank(missing from the photo) effectively. Also the crank didn’t ensure that only one pill was dispensed at a time - skittles sometimes came out in in triplets and would clog the runway. Oh well, that’s what hackathons are for - learning from design you made way too fast. We didn’t really have time to customize a design to 3D model right there and then once we realized this. This was our first hackathon ever, so we didn’t really beat ourselves up over it.
More interesting might be the IoT experience with the Photon, so let’s focus on that for the rest of the post.
Spark Photon has an app (for both IOS and Android), which you can use to connect your spark photon to your wifi network. Sometimes on Windows, I found, this didn’t work and you had to use the command line interface. Once your Photon is connected, you can get to developing.
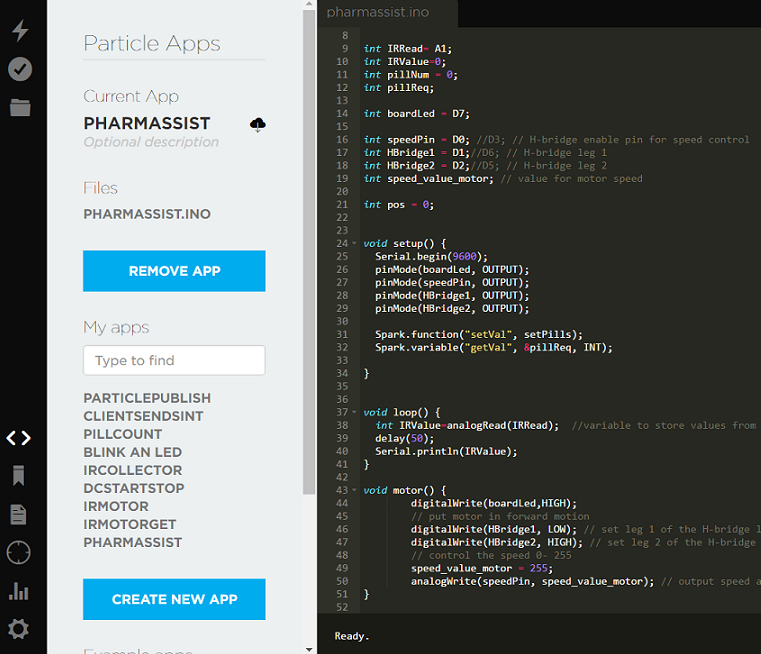
Photon has a web IDE which is pretty handy. It has a very intuitive and easy to use user interface. I felt paranoid about having my files saved only on the web IDE though, so I usually saved my .ino files on Git every once in a while anyways. Photon’s advertising is true to itself in that it is indeed very much like an Arduino experience. As you can see below, I pretty much just coded exactly as if I was writing for Arduino. The only added complexity is Spark Variables and Spark Functions:

I think the only gotcha was trying to use Angular JS with the photon on the client side. This tripped me up a bit, as I couldn’t find many people who had done this online. There was only one part that needed to integrate any code for the Spark photon in anyways, though. This was the one input field for the number of pills to dispense, and the button to tell the photon to dispense pills. You can see the GET and POST request for it here:
//GET
$scope.getSparkValue = function(){
        $http({
            method: 'GET',
            url: "https://api.spark.io/v1/devices/" + deviceID + "/" + getFunc + "/?access_token=" + accessToken,
        })
        .success(function(data) {
                document.getElementById("gotPos").innerHTML = data;
                console.log("get success! data retrieved: " + data);
        })
        .error(function(data, status, headers, config) {
            console.log("get didn't work");
        });
}


$scope.setValue = function () {

    console.log("got to setValue");
    var newValue = document.getElementById('refillNum').value;
    console.log("newValue as of setValue: " + newValue);

        $http({
            method: 'POST',
            url: "https://api.spark.io/v1/devices/" + deviceID + "/" + setFunc + "/?access_token=" + accessToken,
            data: $.param({args: newValue}),
            headers: {'Content-Type': 'application/x-www-form-urlencoded'}
        })
        .success(function(data, status, headers, config) {
            //document.getElementById("gotPos").innerHTML = data;
            console.log("json sent! data sent was: " + data);
        })
        .error(function(data, status, headers, config) {
            console.log("set didn't work");
        });
}

});
You can also just do a call to the Spark API through Jquery, if you’re not using Angular for the rest of your client.
Actually wait, one more gotcha. Spark photon, the last time I tried, does not work on WPA2 enterprise wifi. But other than that I thought it was fairly good.